
Panchromatic film records all colors of light in the same tones of grey. Light Intensity (the number of photons per square inch) is what determines what shade of grey gets produced on film.
Our vision is not like panchromatic film.
We are most sensitive to yellow light, which is right in the middle of the visible spectrum. This is biological sensitivity, due to our vision adapting to sunlight. We are the least sensitive to violet light, followed by blue light. These wavebands are the highest frequency visible light (short wavelength).
If we look at different colors of light, all with exactly the same light intensity, yellow appears the brightest, followed by green and orange, followed by red and blue, with violet the darkest.
Due to atmospheric conditions, excessive amounts of blue and violet light are present outdoors. Blue and violet light have short wavelengths, and do not focus well on the film plane, like longer wavelength light.
Excessive blue and violet light cause haziness on the film, so we need to selectively filter out the excess amounts of blue and violet light, in order to produce clear detailed photographs.
In addition to the biological sensitivity of our vision, our brain automatically makes color corrections, and our vision makes automatic adjustments as well.
An example of this would be walking indoors after being out in the sunlight for some time. When we go inside, electric lights appear yellow. After being indoors for some time, the electric lights appear to be white lights. When we return outdoors, sunlight then appears to be blinding blue white.
Our brain and vision make adjustments to normalize our experience with changing illumination.
What we experience is a corrected rendition of what actually exists. When using black & white film, we need to understand this in order to choose the right filter, to produce the photographic effects we desire.
We need to acknowledge that our color vision allows us to see contrast between objects, when those objects reflect the same amount of light. When we look at sky with clouds, we easily see the contrast between the blue sky and white clouds because of color. In terms of light intensity, the blue sky and white clouds are almost the same.
Unfiltered panchromatic film records a dramatic blue sky with white clouds as almost completely white. Clouds are barely visible. This is disappointing.
It is necessary to correct this “imbalance” by selectively filtering out excess blue and violet light, in order to make black & white photographs capture the same impression as our color vision.
Black & white photographs are renditions of the color scenes they are made from.
Another undesirable element of sunlight is ultraviolet light.
Ultraviolet “light” is actually invisible ultraviolet radiation, which is higher frequency than visible violet light. Ultraviolet light has a shorter wavelength than visible light, and causes the worst haziness on black and white film. Our filters will remove ultraviolet light, along with violet and excess blue light.
There are several reasons why we use black & white filters.
The first reason, as discussed, is to remove excess blue and violet light, in order to “correct” the black & white photograph.
Another way of describing this, is to say that we have automatic correction built into our visual process, so we must manually filter panchromatic film in order to produce the same effect we experience.
The second reason for using filters is to produce contrast between different colored objects that reflect the same amount of light.
An example would be someone wearing an orange shirt, and blue pants. If the orange and blue are the same shade (reflect the same amount of light), they would wind up the same shade of grey on film. The solution would be to choose a filter that would lighten the shirt a bit, and darken the pants a bit. The black & white photo would then exhibit nice contrast, a shirt that appears lighter than the pants.
The third reason for using filters is artistic effects.
Sometimes the real deal just does not cut it.
For example, architectural photographs of dark red brick buildings.
In color film, dark reddish brown colors do not rendition well.
In black & white, a red filter will lighten up the brick to light shades of grey, and will unveil details in the brick that are barely visible in color.
The same red filter can be used in landscape photography, to dramatically darken blue skies, and produce deep shadow effects.
Another factor is that our vision has great dynamic range. We can see something very bright, against something very dim, and see details in both. Not so with film.
A difference of 25% to 50% in light is barely noticeable to our vision, but makes a whopping difference on film. We need to learn how film sees things, in order to produce fine quality photographs.
White light is composed of Red, Orange, Yellow, Green, Blue, and Violet light.
Black and white filters pass their own color band, and block the complementary color.
The complementary color pairs are as follows:
Red - Green
Orange - Blue
Yellow - Violet
The chart shows the 3 complementary color pairs:


We choose filters by using these principles, to select the best overall contrast in our photographs.
Over filtering to produce one desirable effect, can cause us to lose details somewhere else in the photograph.
Here is the basic approach:
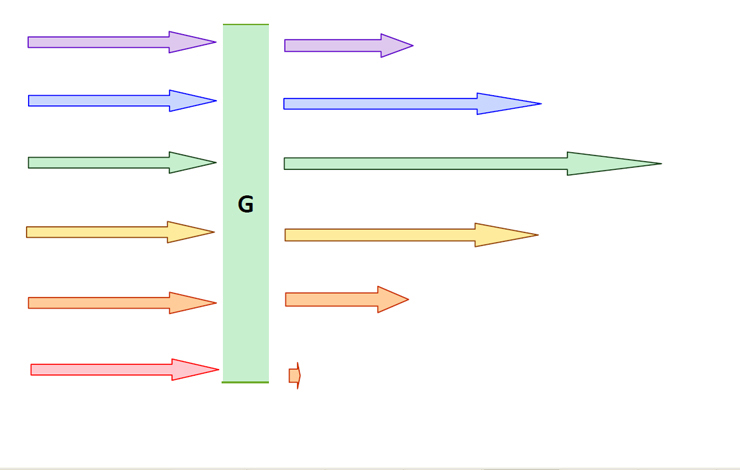
For example, the Red filter has Green as the complement. The Red filter would be used to make Green trees look the darkest against snow topped mountains. The Red filter would also darken Blue skies dramatically, as Blue is 4-color bands away from Red (2nd complement).
A Green filter illuminated with white light looks green, because it absorbs red light (the complement of green). White light is a combination of all visible colors. A Green filter illuminated with red light would look black.
When red light is removed from white light, the result appears green. This is due to the Red-Green complementary pair being broken.
A Green filter absorbs some blue light, but has the effect of lightening blue, because of the Filter Factor adjustment.
A Green filter with a 3X Factor requires the camera to open 1½-stops to compensate for the filter absorbing light.
Green light passes freely through the filter with no loss. When the camera opens 1½-stops, green objects get brightened by 1½-stops. Blue objects, although slightly darkened by the Green filter, lighten up after the 1½-stops adjustment is made.
Green objects become 1½-stops brighter, and blue objects maybe ¾-stop to 1-stop brighter. Violet objects would become darker.
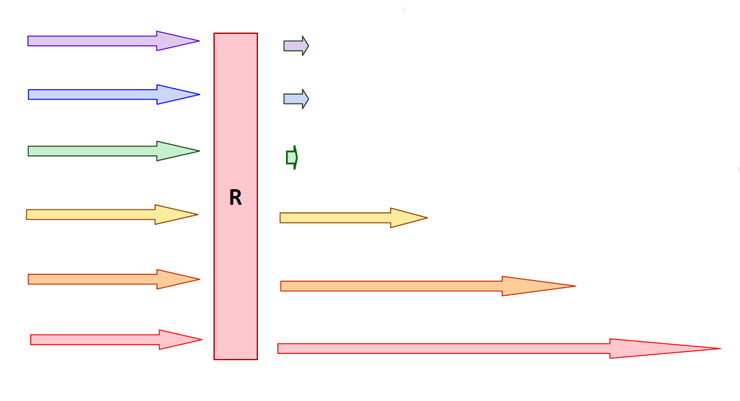
Black & White photographers use filters to selectively remove unwanted wavebands of light, like sculptors removing unwanted marble from a statue.
Here are the filters, and how they are often used:

Yellow Arrow - 2nd Complement
Violet - Complement Filter
UV - 2nd Complement Filter
#8 Medium Yellow [K2, Y2] Filter Factor 2X [1-stop]
By far the most useful filter for black & white photography. This filter makes black & white photographs look like the real scene. Sky and clouds look natural, as do green plants and skin tones. Colors are rendered as proper shades of grey. The #8 Medium Yellow filter can be used probably 60% of the time for black & white photography. The Yellow filter is unique, because it lies in the middle of the visible spectrum, and makes everything look natural.
#3 Light Yellow [K1, Y1] Filter Factor 1.5X [½-stop]
Like the Medium Yellow, except it absorbs less blue light. The Light Yellow filter is best for shadow details, and subdued lighting.
#15 Deep Yellow [K3, Y3] Filter Factor 3X [1½-stop]
This #15 filter is also known as Orange “G” filter by Hoya.
This is a light yellow-orange filter, for use where more blue light needs to be absorbed. Darkens sky and blue water more than #8 Medium Yellow.
Yellow filter effect on color bands of light
The output of the Yellow 8 filter matches the biological sensitivity of our vision. That is why the Yellow 8 filter makes everything look natural with panchromatic film.
After filter factor adjustment has been made

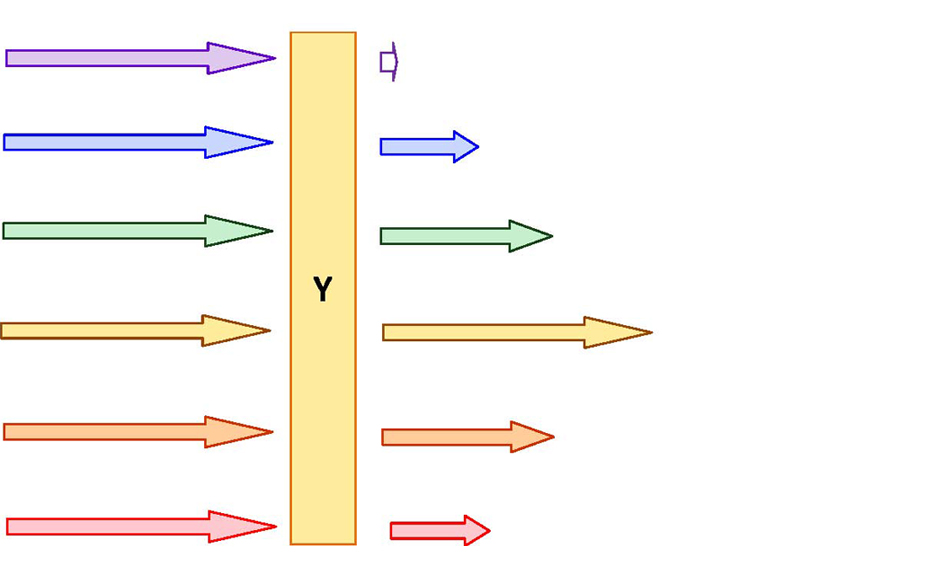
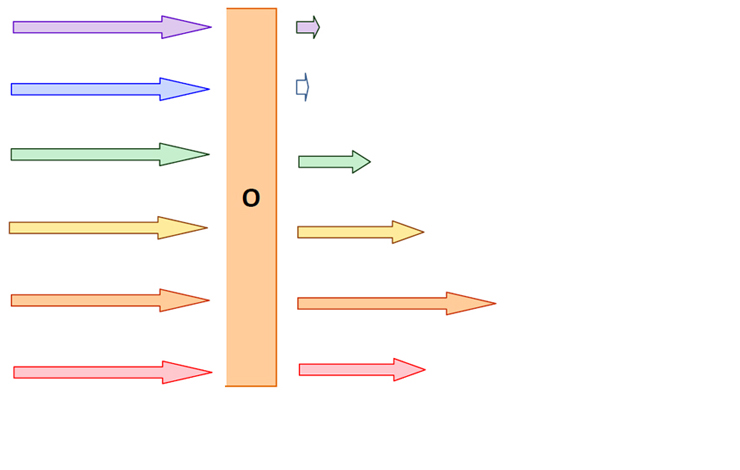
UV - 2nd Complement
R - Complement
G - Filter
#11 Green (Yellow-Green) Filter Factor 3X [1½-stop]
#13 Green (Green-Green) Filter Factor 3X [1½-stop]
#58 Green (Blue-Green) Filter Factor 4X [2-stop]
Green plants help illustrate the biological sensitivity effects. Typically, gardens contain plants that are yellow-green, green-green, and blue-green. Our vision sees the yellow-green plants as the brightest, followed by the green-green, and the blue-green as the darkest. Really, they are all the same as far as light intensity. All three hues of green reflect the same amount of light.
Without a filter, all the different hues of green would be rendered as the same shade of grey. For natural effect, use the #11 Yellow-Green filter (Hoya) in a garden that contains yellow-green plants.
Filters pass their own color band. The Yellow-Green filter passes light that is yellow-green, so yellow-green plants rendition as light grey on black & white film.
If a garden has no yellow-green plants, then use the #13 Green filter (Heliopan). The #13 Green filter will make green-green plants look lighter, with blue-green plants a darker shade of grey.
The #58 Green filter (Vivitar) is useful when surrounded by dark green foliage. This filter will lighten blue ocean, and darken blue skies. [Reason: ocean is blue-green, and sky is blue-violet, and contains much UV.]
Green filter effect on color bands of light
Passive filtering effects
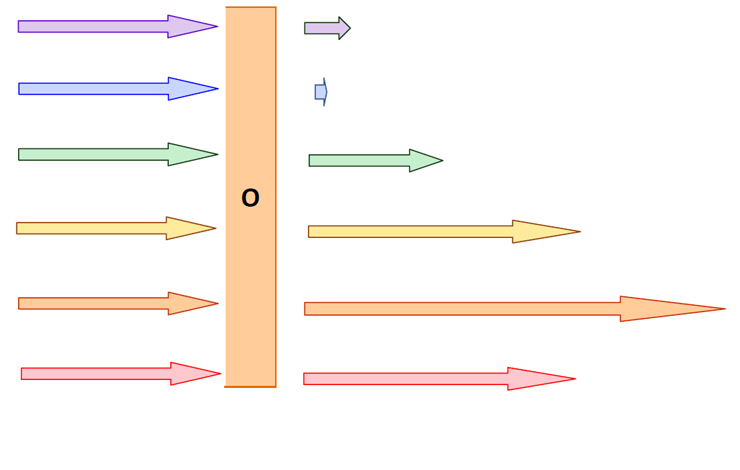
After filter factor adjustment has been made

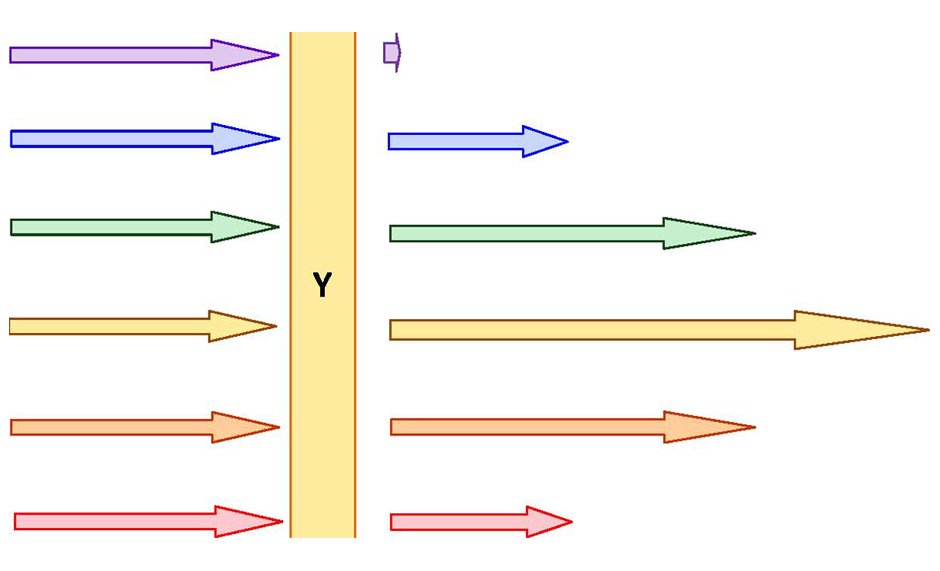
V - 2nd Complement
B - Complement Filter
#16 Orange (Yellow-Orange) Filter Factor 4X [2-stop]
#21 KA2 Orange (Red-Orange) Filter Factor 4X-5X
[2-stop+]
#22 O2 Orange (Red-Orange) Filter Factor 4X-5X [2-stop+]
The #16 Orange filter absorbs more blue light than the #15 Deep Yellow. The #16 deepens blue skies, and darkens blue waters. Shadows become deeper, and produces a 3-dimensional effect on rocky surfaces.
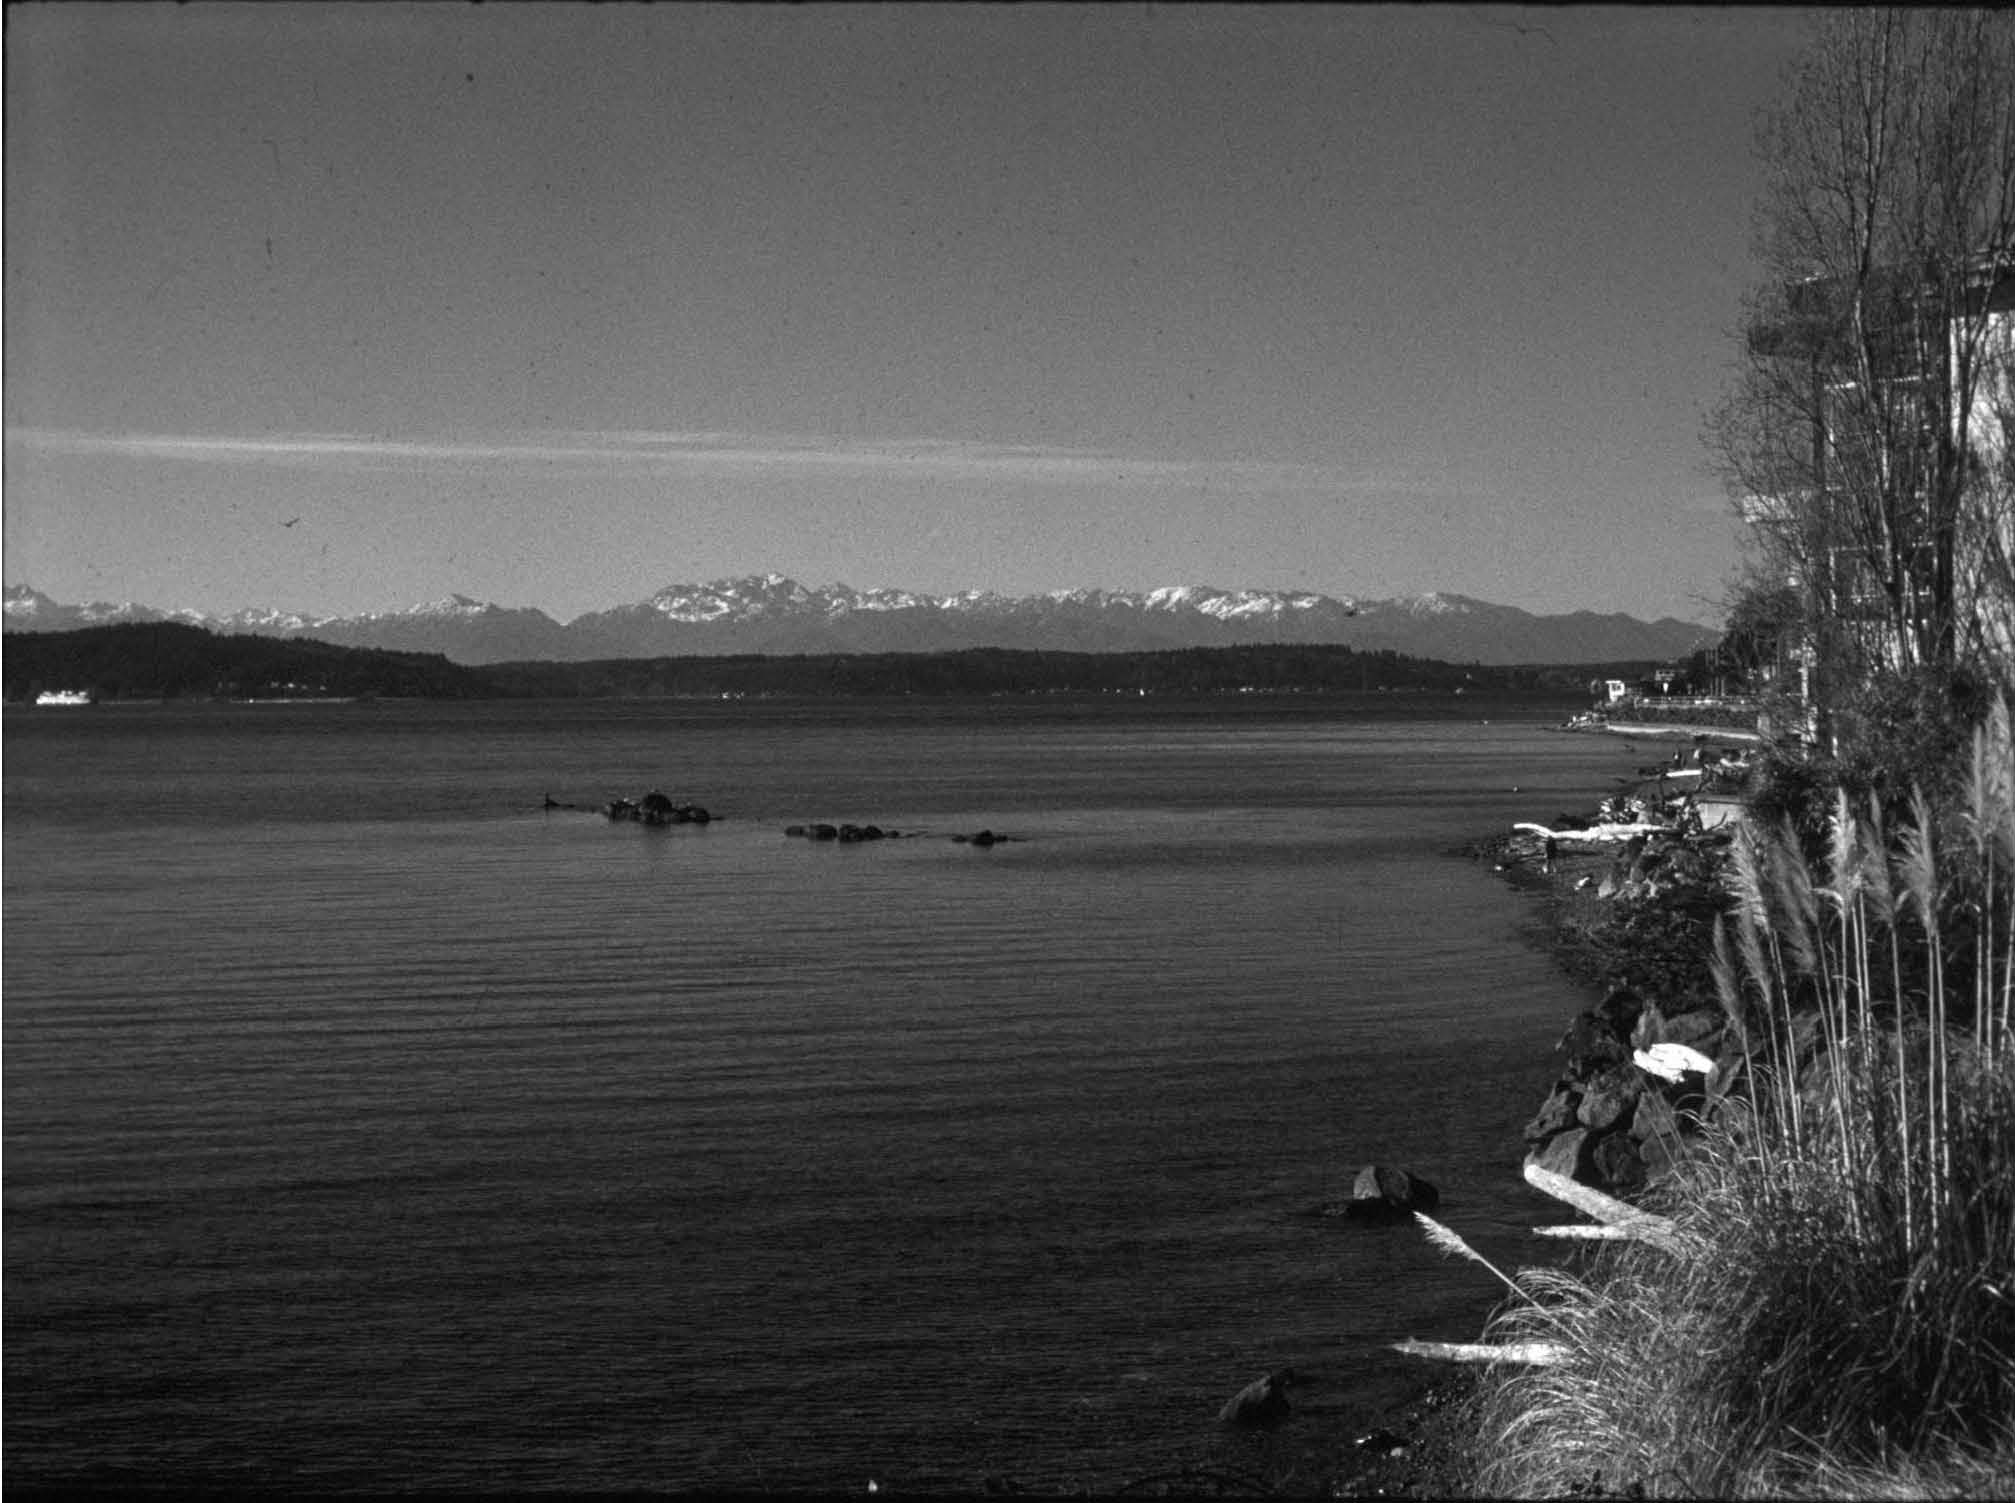
The #21 and #22 Red Orange filters are stronger than the #16, and have an effect similar to the Red 25A filter. These filters work well on architecture and landscapes, especially distant scenes, mountains, etc.
Orange filter effect on color bands of light
Passive filtering effects
After filter factor adjustment has been made
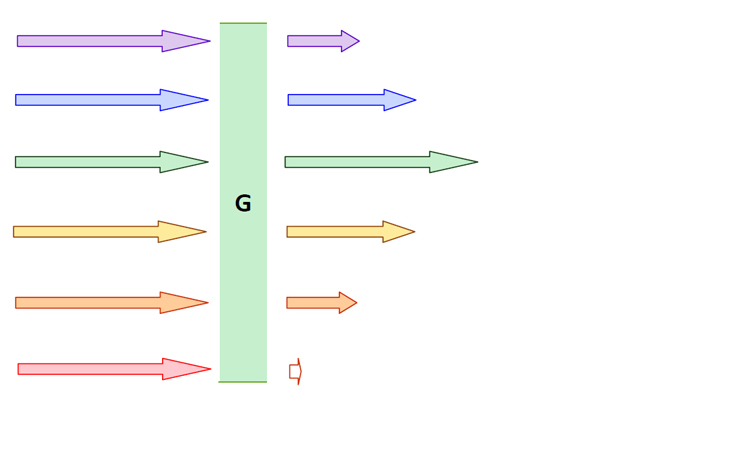
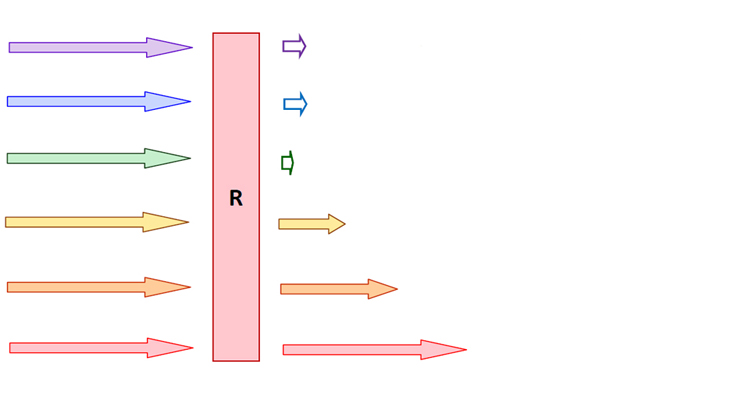
B - 2nd Complement
G -Complement
R - Filter
#25A Red Filter Factor 8X [3-stop]
A really powerful filter for darkening greens and blues, and lightening reds and orange.
The Red filter is unique, because it is at the bottom of the visual spectrum, and behaves like a Low Pass filter.
The Red filter passes reds, orange, and yellow, and filters out green, blue, and violet. It passes long wavelength light, and filters out the high frequency short wavelength light. This results in photographs that are amazingly clear.
Produces dramatic skies with clouds, and for good contrast in scenes that have pale blue skies and oceans.
Works well for architecture, especially red brick buildings, and stonework.
Red filter effect on color bands of light
Passive filtering effects
After filter factor adjustment has been made
Please see The B&W Filters Addendum for additional information.
The B&W Filters Tutorial article is also available for download as a .pdf file.