
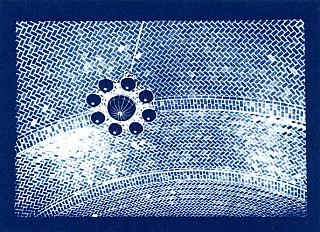
The Cyanotype, which is also known as ferro-prussiate or blueprint was invented by Sir John Herschel in 1842, when he discovered that ferric (iron) salts could be reduced to a ferrous state by light and then combined with other salts to create a blue-and-white image. Not long after, Anna Atkins, one of the few women in photography during that century, published the first book with photographs instead of illustrations, "British Algae: Cyanotype Impressions"
Cyanotype is a contact printing process. You can use traditional black and white negatives (35mm, 120, 4x5, etc.), everyday objects such as flowers or leaves—in the style of Anna Atkins, or make digital negatives from scans or digital images. No matter what you choose to use, the size of the object or negative will determine the size of your print.
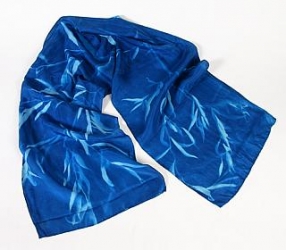
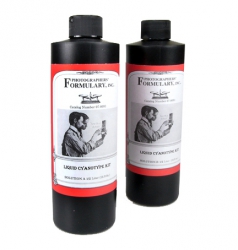
Cyanotypes are created with a simple solution of ferric ammonium citrate and potassium ferricyanide. Freestyle carries the powder chemicals you will need to mix a solution from scratch. If you would like to get right into the action of coating your surfaces, we carry several excellent all-in-one cyanotype kits for you. Our selection of pre-made formulations are available in liquid and powder form. We also carry pre-coated papers, stationery, fabric squares, and silk scarves that make great personalized gifts.
The cyanotype emulsion is sensitive to Ultraviolet light. Therefore either sunlight or an artificial UV light source must be used for exposure. For consistent results, a UV lightbox is recommended. Freestyle offers an excellent, handmade version that is perfect for this application. Another option is to use a General Electric 275-300 watt sunlamp, but the light gets extremely hot, so keep your material at least 12-18 inches away from the bulb. It may be tempting to use a piece of glass to keep your negative down, non-UV coated glass will work best for this.
Besides all the chemicals and a UV light source, we recommend using:
For mixing chemicals and coating your surface, mask (for safety when mixing chemicals), mixing rod, beaker, apron, nitrile gloves, brushes, hair dryer (optional), newspaper.
For printing and wash, negatives/everyday objects, contact print frame or non-UV glass(or clear plexiglass), distilled water, drying screen/blotter book, two trays, and tongs.
(Optional) Hydrogen Peroxide. See Tips section below.
Following is a summary of the process containing important tips and reminders.
To learn how to really do it up in full, and make use of all these wonderful items, get a copy of Jill's book, Photo-Imaging: A complete Guide to Alternative Processes.
If using an everyday object, think about the object’s opaqueness, or how much light can pass through it. An object like a leaf will let more light through than a metal spoon. You can layer objects, such as different leaves and flowers to create an aura effect on your print. If you want well-defined edges you can use an opaque object to create a more stark effect.
If using a digital negative you will need a digital file (jpeg, tiff) and you will need to size the image digitally to your desired print size. You can then invert the image to make it a negative, your blacks are transparent and your whites are opaque and black. You can print the inverted image on one of the various OHP inkjet transparency papers we have at Freestyle.
The cyanotype process has a long exposure scale, so the best cyanotype prints are made when you use a black and white negative with a wide density range. That means that if you have detail in your very bright highlights (Zone 10 or 11, for you zone system folks) you can reproduce it in cyanotype and still get great shadow detail. In general, if your negative will give a good print using grade 0 paper, it will give an excellent cyanotype print.
Almost any porous surface can be used. If you are using paper we suggest that you use a sized but unsensitized or uncoated paper, such as watercolor paper, which we carry at Freestyle. You will need to coat the paper with your solution and let it dry before exposing it.
Want to use something other than paper? Fabric containing at least 50% cotton can be sensitized with the cyanotype emulsion. Soak the fabric in the emulsion preparation and hang it up to dry in the dark. Stretch the material taut, place your negative, and cover it with a piece of optically clear glass.
Other surfaces you could use: Leather, canvas, silk, linen, wool, etc.
Be sure to handle all chemicals carefully. Use disposable rubber gloves, and mix and pour into your beaker very carefully.
You will need at least three plastic or glass dark brown or black storage containers with plastic tops. Do not use metal. Two at 500ml and one at 100ml.
Distilled water is recommended over tap water.
Mix the light sensitive solution in subdued light. Once mixed, it will last only for 2-4 hours, so be ready to use it right away.
Once you have your coated paper or fabric ready, compose your image by placing your objects or negative on top of the coated surface. If you are using a traditional negative or digital negative you will need the non-UV coated glass or contact frame, this is to ensure you get the most sharpness from your image.
As with all printing, be sure to make a test strip before you make your print! On average exposure time is about 10-20 minutes. Expose your print until the highlight values seem darker than you prefer. The highlights will come back in the wash.
Wash your print for five minutes in running water. Be advised that if you have hard water, then a softening filter may be preferable. The iron salts in hard water can alter the appearance of the print. Be sure to wash for the full five minutes or you risk having your print fade.
Blot your print in the blotter book, removing excess water. Dry your print in a dark room, lay the print flat to dry. For spotting your print, use a Persian Blue watercolor.
For spotting your print, use a Persian Blue watercolor.
Wet Cyanotypes produce an ethereal print, which can add an extra layer of meaning and beauty to your photograph. For this type of cyanotype you will follow the same instructions for coating your paper. Before placing your negative or object on top you will need to wet the surface by spraying it with a little water, then continuing to place your negative or object onto your surface. If you are coating your own surface you can use the surface once the paper is damp, but not running with chemistry. (Be careful to only use negatives or objects that you don’t mind staining.) For added dimension and uniqueness, try adding dish soap bubbles, vinegar spray, cling wrap and spices like turmeric, paprika and even beet juice to the surface. Interesting textures and stains can enhance your image.
When your composition is complete, place your layered surface and/or negative in the sun or UV light source for an hour or longer depending on how intense the light is. After the exposure is done you will wash the print in gently running water for five minutes. Then you can blot the print and lay it flat to dry in a dark place or place in a blotter book.
To see the process in action by the artist who has developed "the" wet cyanotype technique, see The Original Wet Cyanotype Tutorial at KristaMcCurdy.com.
Toning your prints: You can tone your prints with different agents to add more colors and change the look of your print. Some toners you can use include copper toners, sepia, gold toners, tannic acid, as well as tea and wine!
Vandyke Brown/ Kallitype Process over Cyanotype: Vandyke Brown over cyanotype will bleach parts of your existing image while creating interesting abstract effects in the highlights. This can be a good process for cyanotypes that appear too dark or overexposed, as the Vandyke process will remove some of the darks. For this second printing you will coat your print either entirely or selectively with the Vandyke Brown solution (use a separate brush from the cyanotype one to avoid contamination), let the solution dry, and then proceed to print.
You can choose to register your negative or image in the same position or skew the image to have a varied effect. The Vandyke Brown print over Cyanotype will require a longer exposure than a regular Vandyke print, and depending on how bright your light source is you can test a print exposure starting between 20-30 minutes. After exposing, wash your print in gently running water for 20 minutes. The print will dry slightly darker than it appears when wet. Blot and dry your print.
Lumen Prints and Cyanotype: Lumen prints are made using old and/or fogged silver gelatin paper, either resin-coated or fiber-based paper will work. If you have this available and you have any leftover solution from your cyanotypes you might want to try combining these two processes. You can coat your darkroom paper with the cyanotype solution using a brush. While the solution is still wet (similar to wet cyanotypes) place your negative or object on top of the paper, then expose in sunlight or UV light source anywhere from 30 minutes to 6 hours. Once you are done exposing your image you will need to fix your image for five minutes in a Fixer bath (follow product instructions for paper dilution and times depending on the paper). After fixing, wash in running water for five minutes before blotting and drying.
Intensifying Blues: For more intense and deeper blues agitate your print for thirty seconds in Hydrogen Peroxide after the initial five-minute wash. Once you have completed the hydrogen peroxide bath, wash your print in running water for one minute before drying.
Reducing the intensity of the blues: If you would like to reduce the intensity of the blues you can try Bleaching. For this you can use a weak solution of Clorox or Dektol. You should follow this step with a water bath to stop the Bleaching process before too much of your detail is gone. As with the other steps, you should use caution and do a test first to figure out what time works best for your image.
Store your prints in a dark environment to prevent the image from fading. To extend the life of your print and maintain an archival, acid-free environment use Lineco unbuffered interleaving tissue.
Problem: The entire print turned blue and over exposed while drying.
Solution: The print was not washed long enough. To prevent this, rinse the print for the full five minutes and dry the print in a darkened room.
Problem: My hands are blue!
Solution: Did you use rubber gloves? A good scrub with a strong soap might help. Otherwise, the stains will fade-away naturally taking a few days to a few weeks.
Alternative Process

Chemicals
Chemicals